Howdy, Stranger!
It looks like you're new here. If you want to get involved, click one of these buttons!
Categories
- 954 All Categories
- 3 Picture Posting and Resizing
- 60 New Member Introductions
- 100 Off-Topic Forum
- 2 Photography
- 2 Resources
- 18 New Product Information
- 164 The SierraWest Forum
- 11 Brett's Blog
- 120 General News & Ramblings
- 3 Re-Release Information
- 1 Q & A about SierraWest
- 9 What Would You Like to See?
- 405 Builds
- 145 HO Scale Builds
- 185 O Scale Builds
- 58 Finished SW Build Pics
- 11 Miscellaneous Builds
- 185 Techniques
- 19 Working with Wood
- 23 Painting Castings
- 4 Masonry
- 16 Scenery
- 37 Tools and Supplies
- 22 Layout Planning & Building
- 38 Miscellaneous
- 19 Prototype Information
- 18 Reference and Research
Detailing Castings
in Techniques
Although the part discussed here is being applied to O'Neills Fabrication, I thought it appropriate to start a new discussion regarding the detailing of castings so as not to muddle up the O'Neills build thread with casting issues that can be applied across all builds.
One problem I have encountered, and would assume others have as well, is keeping the various exhaust stacks, particularly the heavier metal castings, that are mounted on steep pitched roofs from moving whilst the epoxy or other adhesives dry. The castings from Brett are unquestionably the finest in the industry...period! They come with the correct angle cast in the base for mounting on the various roof pitches in the kits. An epoxy "blob" is applied to the base and when "gummy" or "tacky" set in place. I like my stacks, most often, straight and level so I'm constantly leveling my stack as it dries and I have had instances where the stack starts to slide down the roof a bit leaving an unsightly epoxy "skid mark" on the roof!
As a result I have used the following simple technique that elevates the issue completely allowing me ample time to "fiddle" with keeping my stack positioned vertically where I want it without fear of it slipping down the roof:
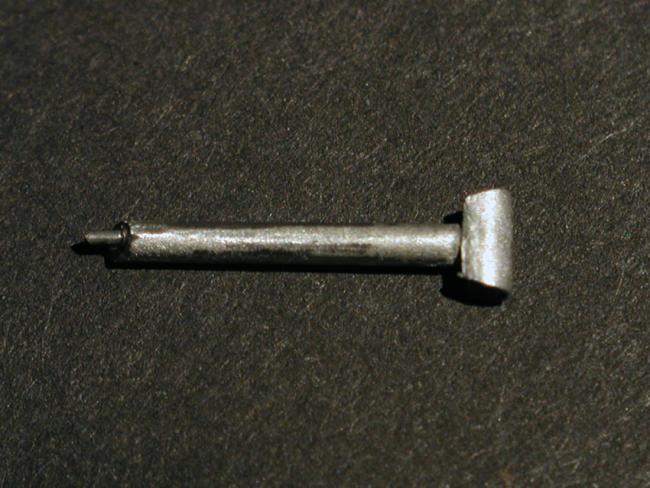
As part of my fine detailing of these stacks, I file the angled base as flat as I can being mindful not to change the angle cast in the stack base. I then drill a hole in the base at the same angle of the stacks vertical attitude. I then epoxy a small pre-cut piece of metal rod into the hole with several millimeters protruding from the base (see illustration below). I make sure to clean and epoxy that smushes (it's a word...look it up!) out of the hole so the angled flat base fits cleanly on the roof. Once dry I then proceed with blackening the stack and final weathering. The epoxy is impervious to the blackening and keeps the blackening solution out of the hole which can be difficult to flush out even with soaking in water.
I then carefully drill a hole in the appropriate location on the roof at an angle that is close to the angle of the stack. this doesn't have to be exact. I then proceed with the epoxy "blob" and insert the rod into the hole in the roof and am now assured the stack will stay in place with my only concern being the vertical orientation which I can easily keep an eye on until fully dry. The hole in the roof should be a bit bigger than the rod to allow for vertical adjustments.

Exhaust stack for O'Neills Fabrication, Tower application. Note the rod protruding from drilled hole in angled base.

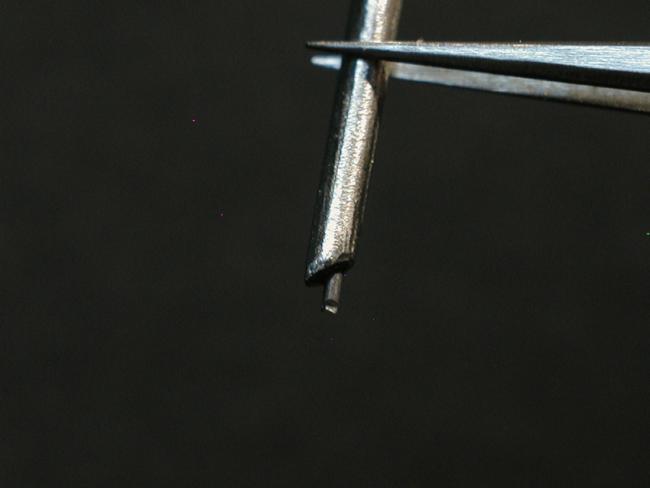
Close up of same. Note the file marks on the stack pipe. All part of fine casting detail prep.

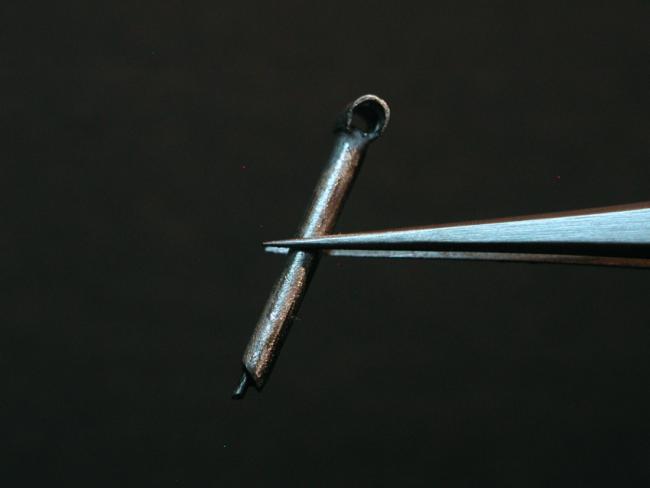
Stack ready for blackening and final detail weathering. Note the stack weather cap. I drilled out the metal casting material from under the curved cap which is virtually impossible to cast that way but illustrates the level of detail that these wonderful castings deserve.
One problem I have encountered, and would assume others have as well, is keeping the various exhaust stacks, particularly the heavier metal castings, that are mounted on steep pitched roofs from moving whilst the epoxy or other adhesives dry. The castings from Brett are unquestionably the finest in the industry...period! They come with the correct angle cast in the base for mounting on the various roof pitches in the kits. An epoxy "blob" is applied to the base and when "gummy" or "tacky" set in place. I like my stacks, most often, straight and level so I'm constantly leveling my stack as it dries and I have had instances where the stack starts to slide down the roof a bit leaving an unsightly epoxy "skid mark" on the roof!
As a result I have used the following simple technique that elevates the issue completely allowing me ample time to "fiddle" with keeping my stack positioned vertically where I want it without fear of it slipping down the roof:
As part of my fine detailing of these stacks, I file the angled base as flat as I can being mindful not to change the angle cast in the stack base. I then drill a hole in the base at the same angle of the stacks vertical attitude. I then epoxy a small pre-cut piece of metal rod into the hole with several millimeters protruding from the base (see illustration below). I make sure to clean and epoxy that smushes (it's a word...look it up!) out of the hole so the angled flat base fits cleanly on the roof. Once dry I then proceed with blackening the stack and final weathering. The epoxy is impervious to the blackening and keeps the blackening solution out of the hole which can be difficult to flush out even with soaking in water.
I then carefully drill a hole in the appropriate location on the roof at an angle that is close to the angle of the stack. this doesn't have to be exact. I then proceed with the epoxy "blob" and insert the rod into the hole in the roof and am now assured the stack will stay in place with my only concern being the vertical orientation which I can easily keep an eye on until fully dry. The hole in the roof should be a bit bigger than the rod to allow for vertical adjustments.

Exhaust stack for O'Neills Fabrication, Tower application. Note the rod protruding from drilled hole in angled base.

Close up of same. Note the file marks on the stack pipe. All part of fine casting detail prep.

Stack ready for blackening and final detail weathering. Note the stack weather cap. I drilled out the metal casting material from under the curved cap which is virtually impossible to cast that way but illustrates the level of detail that these wonderful castings deserve.


Comments
Better image illustrating the drilled out cap detail...
Jim
What a simple but GREAT idea. It's one of those "why in the heck didn't I think of that." I have had that problem many times. Thanks so much for sharing it along with all your other wonderful modeling skills!
Bill
I decided to use a main support rod with external wiring to dress up these guys a bit and add a different look compared to the other three external lamps.
I started by measuring the support rod (brass rod included in the kit) length to where I wanted the lamps to be positioned and cut. I then blackened both support rods. After a light buffing I primed in brown paint and when that cured went back over with an off white. Once the white was dry to the touch I picked at the paint with a tooth pick and then weathered with chalks. The lamp shades were primed and painted green and then picked and weathered with chalks. I then drilled a small hole in the side of the shade base and took some thin thread and weathered with chalks and glues one end in the h9ole and then wrapped and glued the other end to the tip of the rod. This portion will not show as it is mounted up under the overhead roofs. A small blob of epoxy simulating a light bulb and theses guys are ready to install.
-Steve
Alan, primed with grey spray paint then followed with brushed on concrete. Highlighted cracks and texture by brushing on dry black chalk and wiping off excess with my fingers leaving the low areas dark then followed with light dusting on top with a dark rust and 408.3.
Appreciate that Jerry. Texture appears a bit rough due to the close shot but at scale looks much smoother. Will get a few shots soon of the lights installed on the Main Building
Bill
Thanks much Brett and couldn't pass up sharing the cool profile shot of the lamp.
I worked mine up with a hose lopped around the valve for effect, but certainly not something that needs to be done for this tank to look great. Supports were primed and rusted with chalk. Next up will be the Oil Drum Tipping Cradle...Ken
I may have gotten a bit carried away with the pictures...oh well...suffer through it!