Howdy, Stranger!
It looks like you're new here. If you want to get involved, click one of these buttons!
Categories
- 996 All Categories
- 3 Picture Posting and Resizing
- 58 New Member Introductions
- 120 Off-Topic Forum
- 4 Photography
- 2 Resources
- 18 New Product Information
- 170 The SierraWest Forum
- 10 Brett's Blog
- 121 General News & Ramblings
- 3 Re-Release Information
- 6 Q & A about SierraWest
- 9 What Would You Like to See?
- 408 Builds
- 145 HO Scale Builds
- 180 O Scale Builds
- 62 Finished SW Build Pics
- 15 Miscellaneous Builds
- 195 Techniques
- 19 Working with Wood
- 23 Painting Castings
- 5 Masonry
- 23 Scenery
- 37 Tools and Supplies
- 22 Layout Planning & Building
- 40 Miscellaneous
- 24 Prototype Information
- 22 Reference and Research
Scratch Built Lumber Camp Bunkhouse
As I was waiting for my next SierraWest kit to arrive, i thought i'd try my hands at a scratch build. Its like taking the techniques learned in class and seeing if I could do it on my own. One scene i need to create is a lumber camp so i thought this would be a good place to start.
The first building i started with was a simple bunkhouse. I love the images from the Hangman Creek Diorama Company and how they depicted their lumber camp so that became my inspiration.
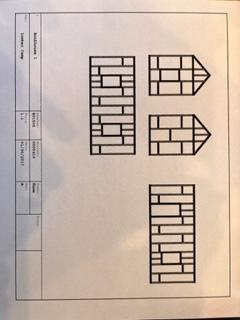
My first step was to create my "blueprints". I like to use SmartDraw online. Its sure its not the best CAD tool out there but it works nice for simple drawings. Here's what i developed for the frame blueprint.
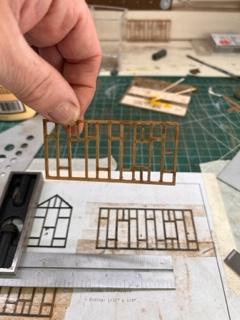
After going through the process of building the frame, i realized now nice it is to get those laser cut frames from SierraWest! I was pleased with how it turned out but it was a little time consuming.
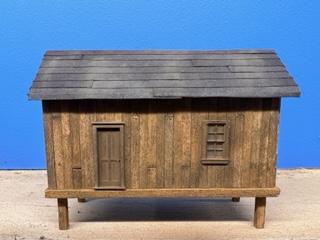
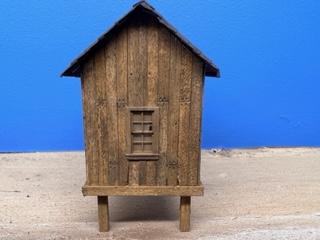
And now the finished product. The one adjustment i had to make was how i handled the roof. Originally i had planned on using rafter studs and wood planks covered by tar paper. But one thing i didn't think through was the fact that that the side walls need to be slightly higher than the front and back walls to account for the studs. since i didn't do that, i used the old cardboard method. Now that i went through this process, i'm going to try my original approach on the dining hall build which is next on the agenda.
Here's the final product. I'll add the porch and stairs when i fit this into my layout to see how elevated this bunkhouse will be from the ground.
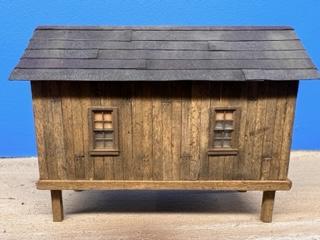
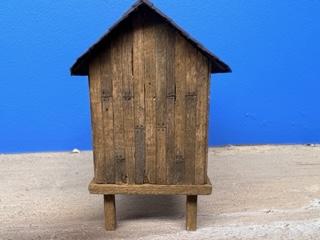
(FYI: My next kit just arrived so this project will take a back seat for a bit).
The first building i started with was a simple bunkhouse. I love the images from the Hangman Creek Diorama Company and how they depicted their lumber camp so that became my inspiration.
My first step was to create my "blueprints". I like to use SmartDraw online. Its sure its not the best CAD tool out there but it works nice for simple drawings. Here's what i developed for the frame blueprint.

After going through the process of building the frame, i realized now nice it is to get those laser cut frames from SierraWest! I was pleased with how it turned out but it was a little time consuming.

And now the finished product. The one adjustment i had to make was how i handled the roof. Originally i had planned on using rafter studs and wood planks covered by tar paper. But one thing i didn't think through was the fact that that the side walls need to be slightly higher than the front and back walls to account for the studs. since i didn't do that, i used the old cardboard method. Now that i went through this process, i'm going to try my original approach on the dining hall build which is next on the agenda.
Here's the final product. I'll add the porch and stairs when i fit this into my layout to see how elevated this bunkhouse will be from the ground.


(FYI: My next kit just arrived so this project will take a back seat for a bit).


Comments
The structure looks good. I think when you find the spot on your layout that you should reconsider the foundation...it just doesn't look quite right. If you keep the supports vertical, maybe another set or 2 would help. I'm wondering how rr ties laid horizontally in a criss-cross would look as a foundation.
Later, Dave S. Tucson, AZ