Howdy, Stranger!
It looks like you're new here. If you want to get involved, click one of these buttons!
Categories
- 993 All Categories
- 3 Picture Posting and Resizing
- 60 New Member Introductions
- 118 Off-Topic Forum
- 2 Photography
- 2 Resources
- 18 New Product Information
- 170 The SierraWest Forum
- 12 Brett's Blog
- 120 General News & Ramblings
- 3 Re-Release Information
- 6 Q & A about SierraWest
- 9 What Would You Like to See?
- 410 Builds
- 146 HO Scale Builds
- 185 O Scale Builds
- 58 Finished SW Build Pics
- 15 Miscellaneous Builds
- 194 Techniques
- 19 Working with Wood
- 23 Painting Castings
- 4 Masonry
- 23 Scenery
- 37 Tools and Supplies
- 22 Layout Planning & Building
- 40 Miscellaneous
- 20 Prototype Information
- 19 Reference and Research
Blue Sky Company with a twist
Ok guys, after some contemplating about what to choose for the next project, I decided to attack the Blue Sky Company kit.
Now, for this one I had to do some serious thinking, that is, it looks like I can never just open the box( of any kit) and just do as the manual tells me to. Which is perfectly fine by the way. But Robert.G wouldn't be himself if he wasn't gonna modify the kit in question.
So first, I always find it hard to leave the builds closed. The outsides are always so great, the insides, the laser cut walls, also, but nobody ever gets to see them, so as with previous builds, I decided to open this one also. BUT.... that has some serious consequences.. If you want people to look inside, there have to be some interesting things to expect. In this case, what did I plan to do...
First, and let it be well understood, the kit as is is just great, I only want to make it my personal version of it. Hence the twist...
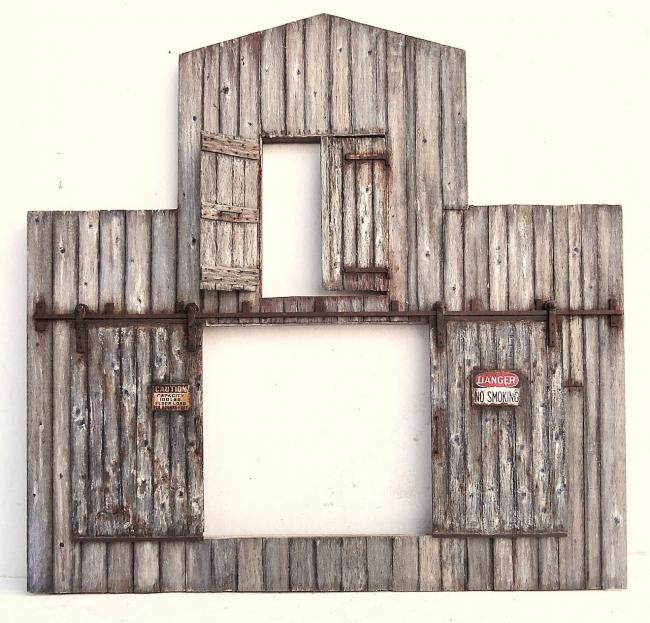
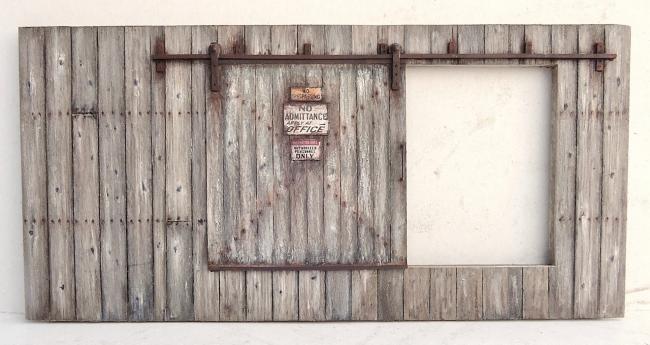
So, to begin with, I changed the loading dock doors to two big sliding ones. So the opening will be much wider and more of the inside can be seen. The doors are not completely opened, so one can see the door construction from the back when peeping inside..
That means that a floor needs to be installed. No problem..
I also lowered the first floor opening in the wall. Usually this opening is on the same level as the floor of the first floor. Which is also the ceiling of the ground floor. Makes sense, because otherwise heavy goods lifted with the pulley need to go higher, pulled inside and lowered again. Same when stuff needs to go out that way. Research was done on the internet. pics on request.. btw, the door on the side wall is also on that level...
I also made an opening at the back , where the cookhouse would be installed. That will get another location. I figured all those goods can't go in and out just through the original smaller doors, on a relatively narrow loading dock.
But as the floor of the ground floor is at the same level as the loading dock, higher than the outside ground level, I will install a ramp leading to the back entrance.
I also chose a silver gray-isch kind of weathering this time
As you can see, I don't make it easy on myself, but it's a challenge. An adventure.. And this is only the beginning...
Oh my God.. Now this is posted, no way back..


soon more...
Now, for this one I had to do some serious thinking, that is, it looks like I can never just open the box( of any kit) and just do as the manual tells me to. Which is perfectly fine by the way. But Robert.G wouldn't be himself if he wasn't gonna modify the kit in question.
So first, I always find it hard to leave the builds closed. The outsides are always so great, the insides, the laser cut walls, also, but nobody ever gets to see them, so as with previous builds, I decided to open this one also. BUT.... that has some serious consequences.. If you want people to look inside, there have to be some interesting things to expect. In this case, what did I plan to do...
First, and let it be well understood, the kit as is is just great, I only want to make it my personal version of it. Hence the twist...
So, to begin with, I changed the loading dock doors to two big sliding ones. So the opening will be much wider and more of the inside can be seen. The doors are not completely opened, so one can see the door construction from the back when peeping inside..
That means that a floor needs to be installed. No problem..
I also lowered the first floor opening in the wall. Usually this opening is on the same level as the floor of the first floor. Which is also the ceiling of the ground floor. Makes sense, because otherwise heavy goods lifted with the pulley need to go higher, pulled inside and lowered again. Same when stuff needs to go out that way. Research was done on the internet. pics on request..
I also made an opening at the back , where the cookhouse would be installed. That will get another location. I figured all those goods can't go in and out just through the original smaller doors, on a relatively narrow loading dock.
But as the floor of the ground floor is at the same level as the loading dock, higher than the outside ground level, I will install a ramp leading to the back entrance.
I also chose a silver gray-isch kind of weathering this time
As you can see, I don't make it easy on myself, but it's a challenge. An adventure.. And this is only the beginning...
Oh my God.. Now this is posted, no way back..


soon more...

Comments
Off to your usual intriguing start. I like how you show the nailing pattern of the interior cross bracing pieces in the single sliding door, subtle but very effective.
http://www.craftsmankituniversity.com/vanforum/uploads/imageupload/439/6LVQGHMIOATB.jpg
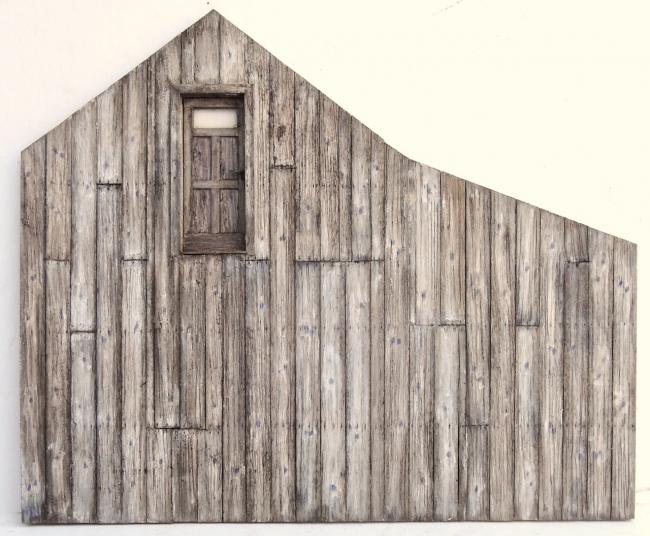
I am also noticing nail heads in the structure siding, something I don't recall spotting in your previous builds.
Later, Dave S. Tucson, AZ
Terry
Jerry
Greetings.
JM
Here's also some progress on the walls of the second building. I changed the door which I found it to low when putting a 1/48 figure in front of it. Couldn't go under or enter without hitting the head. ..Final weathering later on...
soon more... well, not that soon..