Howdy, Stranger!
It looks like you're new here. If you want to get involved, click one of these buttons!
Categories
- 954 All Categories
- 3 Picture Posting and Resizing
- 60 New Member Introductions
- 100 Off-Topic Forum
- 2 Photography
- 2 Resources
- 18 New Product Information
- 164 The SierraWest Forum
- 11 Brett's Blog
- 120 General News & Ramblings
- 3 Re-Release Information
- 1 Q & A about SierraWest
- 9 What Would You Like to See?
- 405 Builds
- 145 HO Scale Builds
- 185 O Scale Builds
- 58 Finished SW Build Pics
- 11 Miscellaneous Builds
- 185 Techniques
- 19 Working with Wood
- 23 Painting Castings
- 4 Masonry
- 16 Scenery
- 37 Tools and Supplies
- 22 Layout Planning & Building
- 38 Miscellaneous
- 19 Prototype Information
- 18 Reference and Research
O'Neils with another name
Hi everyone.
I'm new around here, I just landed. I hope you are all OK.
I am from Spain and I am passionate about railway modeling.
I had never seen Brett's wooden kits before, I came to Sierra West by chance, I really liked the O'NEILS kit. I started with the kit as soon as it arrived at my house and I have a great time building it.
It is the first time I have made something with wood and I am enjoying it.
In the photos you will see that the posters and labels are not in English, I have Spanishized it by giving the kit another name. His name is not O'Neils, his name is Balboa. Here in Spain, in the Euskadi community, there were very similar factories in the past, and I have allowed myself the license to adapt it, but only in the name, labels, and in the assembly of the wooden planks, everything else remains the same.
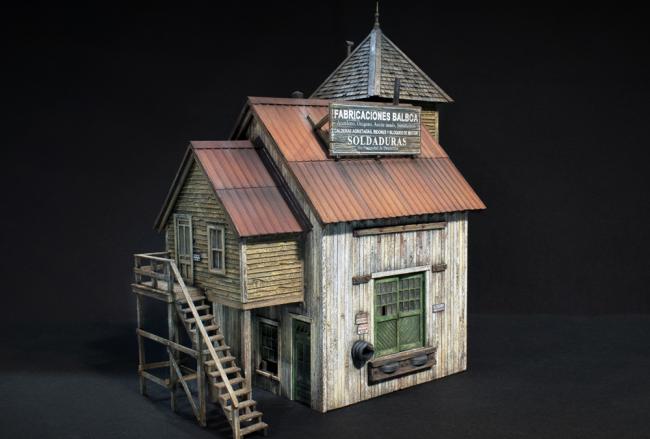
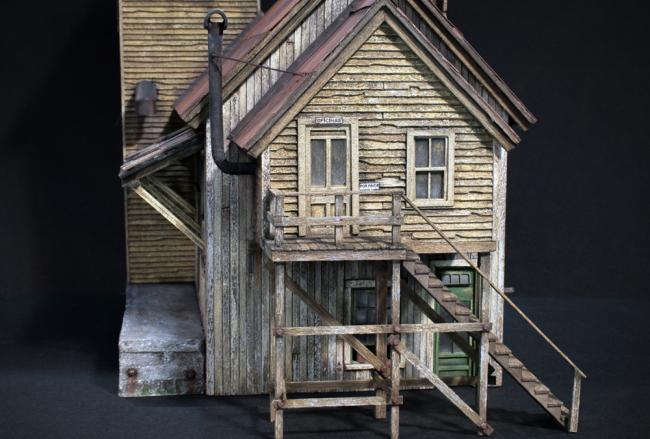
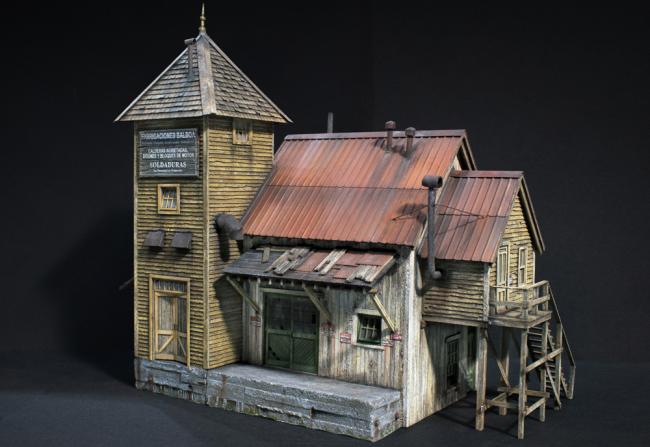
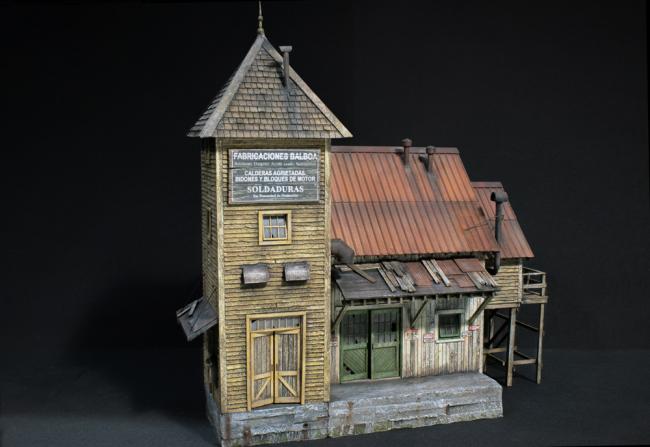
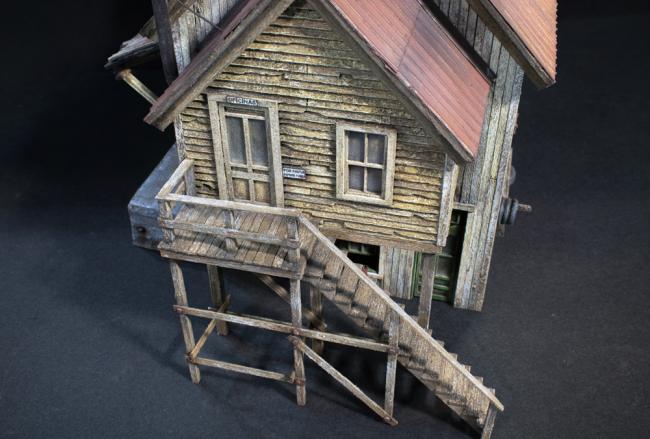
I have also had a little problem with understanding the language, translating concepts that can be expressed in another way in my language. My English is not very good, and with the help of the translators I am getting ahead.
Another small drawback has been to go from inches to millimeters, "I have gone crazy". I have been meticulous not to err in choosing the wooden slats, and in some cases I have inadvertently changed the thicknesses.
A greeting.
Jose Manuel
I'm new around here, I just landed. I hope you are all OK.
I am from Spain and I am passionate about railway modeling.
I had never seen Brett's wooden kits before, I came to Sierra West by chance, I really liked the O'NEILS kit. I started with the kit as soon as it arrived at my house and I have a great time building it.
It is the first time I have made something with wood and I am enjoying it.
In the photos you will see that the posters and labels are not in English, I have Spanishized it by giving the kit another name. His name is not O'Neils, his name is Balboa. Here in Spain, in the Euskadi community, there were very similar factories in the past, and I have allowed myself the license to adapt it, but only in the name, labels, and in the assembly of the wooden planks, everything else remains the same.


I have also had a little problem with understanding the language, translating concepts that can be expressed in another way in my language. My English is not very good, and with the help of the translators I am getting ahead.
Another small drawback has been to go from inches to millimeters, "I have gone crazy". I have been meticulous not to err in choosing the wooden slats, and in some cases I have inadvertently changed the thicknesses.
A greeting.
Jose Manuel


Comments
Is there a program you are using to recreate your signs?
I don't know if this is what you wanted to ask me.
I forgot, after looking for the similar typeface, I edited them in Adobe Illustrator.
Greetings.
Jose Manuel
Yes, I will upload photos as I progress.
Greetings.
Jose Manuel
Jerry
Thanks for sharing your build of this kit along with all the excellent photos.
I am inspired by your modeling. Could you share some additional information on the type of ink, paint and chalk that you use to get the vivid colors we see in the photos.
Just out of curiosity in your build did you use the HO (1/87th) or O-Scale (1/48th) scale kit?
In addition to your modeling being top notch your photography is as well.
Ed, your Spanish isn't that poor, it's good. You can have a long conversation with any Spanish.
Dave, I hope I don't bore you with such a long explanation.
O'Neills (Balboa) I'm building it in H0
I use the same brand of chalk that Brett says in the manual, Rembrandt, I have been using them for over 10 years.
The acrylics are from Model Color and Model Air from Vallejo.
Once the chalks and acrylics have been applied to the wood, I fix them with White Spirit and a wash of Ammo Mig, I can't tell you the reference because I'm not at home, and I don't remember.
This makes the colors pop.
Regarding the photography, I use a Kikon D3500, the photo is taken indoors. The white balance of the camera is done manually, since I have a hodgepodge of light types: halogens, LEDs, ... also to cause harsh shadows I use a 500 Watt bulb.
I close the diaphragm enough so that the photo comes out as focused as possible. Since exposures are long, the camera is mounted on a tripod and has a self-timer.
If you need me to explain a concept further, tell me.
Thank you for the additional information regarding chalks, paint, washes and your camera.
In the early 1970's I learned to use a Canon FTB camera that shot slide film and negatives for printing. I mostly focused on black and white photography in those days and using my dark room for printing. Using the Canon FTB taught me how to use depth of field (aperture opening/f stops) and shutter speeds and the different Kodak films available in that era to great advantage along with a wide angle lens, the standard 50mm lens and telephoto lenses. What I haven't mastered however are all these new digital cameras and their features since I haven't taken the time to learn how override their built in exposure systems and set my desired depth of field and exposure times. Consequently, I take the easy route and just use my Apple i-phone.
As your time permits I would like more information about which Ammo Mig washes you use and how you apply the white spirits. Perhaps you can give a more detailed explanation on the next SWSM kit you build. I was introduced to the Ammo Mig paint/washes by a modeler here on the SWSM forum and still need to learn more about their application and uses. Like you and many of the modelers here on the SWSM forum I use Rembrandt chalks exclusively and am fortunate to have a great art supply store near where I live that carries hundreds of possible color sticks for our use.
Thanks, Later Dave S. Tucson, Arizona
Ed, to your question about Judean Bitumen, tell you that I don't use it.
Dave, I use the camera in manual, not automatic. In automatic I use it for other types of photos. The good thing about these digital cameras is that you can repeat the photo until you like it without wasting film.
What I do with the washes is the following: in a small container I mix the White Spirit with the wash, 60% - 40% approximately, depending on how dark you want it. Once the wooden slats have been stained and painted with the acrylics and dried, I brush them with the mixture made previously.
This process contrasts stained wood with acrylic, the wood is darker, depending on the mix, and the acrylic hardly darkens. In addition, this process fixes the powders without leaving a stain on the fingers in subsequent manipulations.
I'll give you the reference of the wood wash at another time, I'm not at home and I don't remember the number.
Greetings.
Jose Manuel
If you need me to tell you any questions you have about it, ask me.
Dave, the wash reference: MIG-1007, he calls US MODERN VEHICLES.
Also tell you that not all White Spirit work well with these enamels, I usually use the one of their brand or one that I do not know if you will have it in your fine arts stores, it is called LIENZOS LEVANTE and I liked very well for all enamels and oils.
I leave you the link of the photo in case you find it there.
https://images-na.ssl-images-amazon.com/images/I/815DMII3Y1L._AC_SL1500_.jpg
Later, Dave S. Tucson, AZ
Wonderfully done and thank you for sharing so much insight into how you got such great results.
Thanks,
Tom
Another step.
Communication staircase between the tower and the main building.
Photos from different angles.
Greetings.
Jose Manuel
Thanks for your comments. It made me laugh.
I am not going to put a railing because this area is attached to the rear wall of the welding shop, it does not need it.
It is true that until this arrives I am going to prohibit the passage to the Spanish adventurers because of the free fall.
Greetings.
Jose Manuel
Ditto to Ed's comment, you are indeed a wonderful new member. But this forum is blessed to have many, many fine modelers who are willing to share their ideas, talents, comments and suggestions. New blood gets everyone's creative juices flowing.
Later, Dave S. Tucson, AZ
Thanks Ed and Dave.
I am moving forward.
Supports and under covers of the canopy of the main building.
They are not glued yet, they will be fixed on the diorama.
I think I've said it before. I'm having a great time building this kit. It is the first time I have made something in wood and I am enjoying it a lot.
Greetings.
Jose Manuel