Howdy, Stranger!
It looks like you're new here. If you want to get involved, click one of these buttons!
Categories
- 954 All Categories
- 3 Picture Posting and Resizing
- 60 New Member Introductions
- 100 Off-Topic Forum
- 2 Photography
- 2 Resources
- 18 New Product Information
- 164 The SierraWest Forum
- 11 Brett's Blog
- 120 General News & Ramblings
- 3 Re-Release Information
- 1 Q & A about SierraWest
- 9 What Would You Like to See?
- 405 Builds
- 145 HO Scale Builds
- 185 O Scale Builds
- 58 Finished SW Build Pics
- 11 Miscellaneous Builds
- 185 Techniques
- 19 Working with Wood
- 23 Painting Castings
- 4 Masonry
- 16 Scenery
- 37 Tools and Supplies
- 22 Layout Planning & Building
- 38 Miscellaneous
- 19 Prototype Information
- 18 Reference and Research
O scale dolbeer forum build.
Hey everyone,
I'm going to build another Dolbeer and this time around i thought i would make this a forum build. Here is my last Dolbeer; http://www.craftsmankituniversity.com/vanforum/index.php?p=/discussion/1068/o-scale-dolbeer#latest
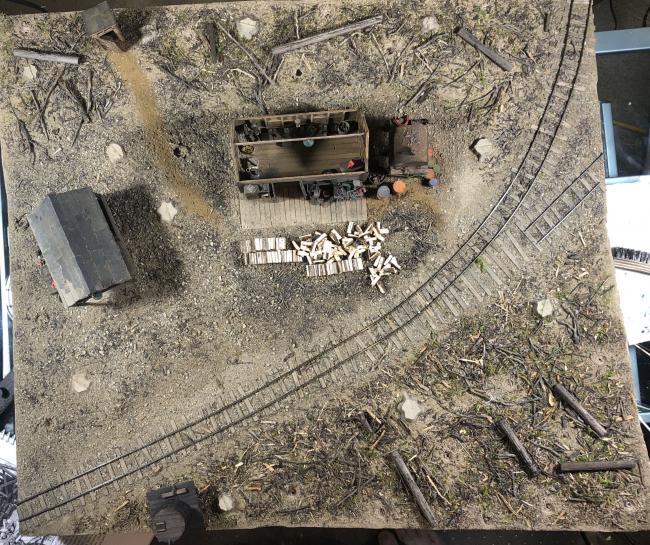
To me a forum build means forum members will help guide the build. You guys make recommendations and that's the way the build goes. However, in order to make recommendations there needs to be a stated goal. I was not planning to complete this build. This Dolbeer will go somewhere around the work shed in the below photo and either be under repair or conversation or something in between?
Maybe someone will have an idea i hadn't thought of.

For anyone who has built the HO scale Donkey repair, you will recognize the next photos. This is kind of what i kind of had in mind.


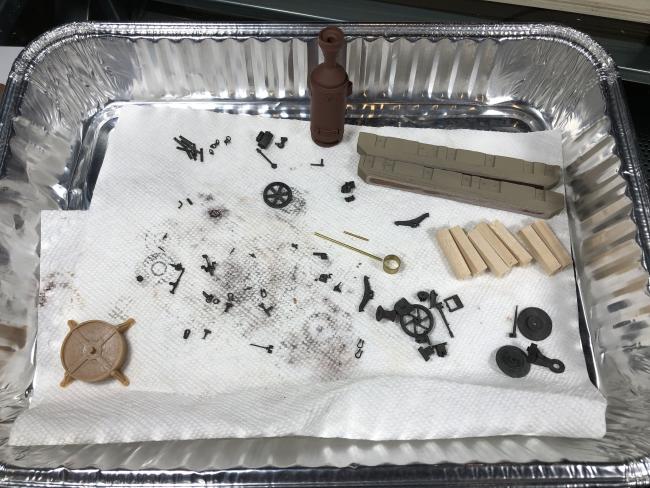
Below is the current state of the forum build. I did not paint the boiler casting with black as i was going to do the top coat with water based black and then "wear" it away to expose the rust below... (i don't know how much weathering to do on this one)

So, with that being said, my current thought is to have the skids Fully assembled, and the boiler mounted and somewhere between 50-80% assembled the blow down vales ect installed. But, maybe not the steam valve assembly, that may be laying on the skids? Any extra parts will be strewn about similar to the donkey repair.. The less assembled the more parts to scatter about.
Any and all input is more than welcome.
I'm going to build another Dolbeer and this time around i thought i would make this a forum build. Here is my last Dolbeer; http://www.craftsmankituniversity.com/vanforum/index.php?p=/discussion/1068/o-scale-dolbeer#latest
To me a forum build means forum members will help guide the build. You guys make recommendations and that's the way the build goes. However, in order to make recommendations there needs to be a stated goal. I was not planning to complete this build. This Dolbeer will go somewhere around the work shed in the below photo and either be under repair or conversation or something in between?
Maybe someone will have an idea i hadn't thought of.

For anyone who has built the HO scale Donkey repair, you will recognize the next photos. This is kind of what i kind of had in mind.


Below is the current state of the forum build. I did not paint the boiler casting with black as i was going to do the top coat with water based black and then "wear" it away to expose the rust below... (i don't know how much weathering to do on this one)

So, with that being said, my current thought is to have the skids Fully assembled, and the boiler mounted and somewhere between 50-80% assembled the blow down vales ect installed. But, maybe not the steam valve assembly, that may be laying on the skids? Any extra parts will be strewn about similar to the donkey repair.. The less assembled the more parts to scatter about.
Any and all input is more than welcome.

Comments
I could do one somewhat over the dolbeer. Maybe removing the steam piston assembly from the boiler?
Maybe something like the photo below? a smaller hand powered hoist? this would easily fit in the area available. If anyone has a different idea, please share a photo. Or, even a photo of a hand drawn sketch.
Below is the progress as of today. Tomorrow i can dry fit the boiler and start weathering the skids..
Does the group think this dolbeer should be more weathered than the one below, or not?
Rick
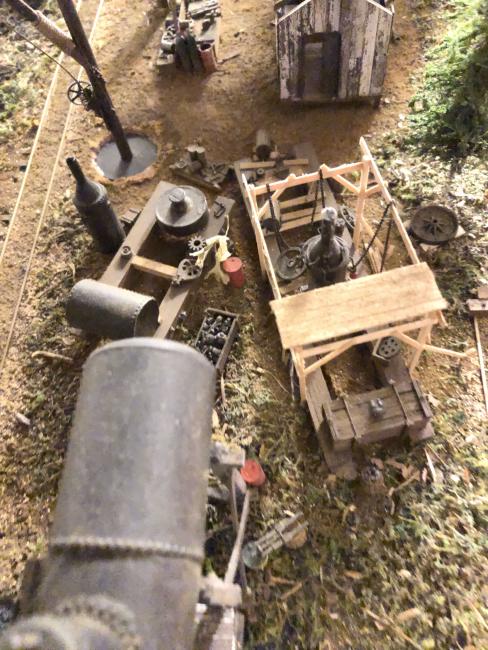
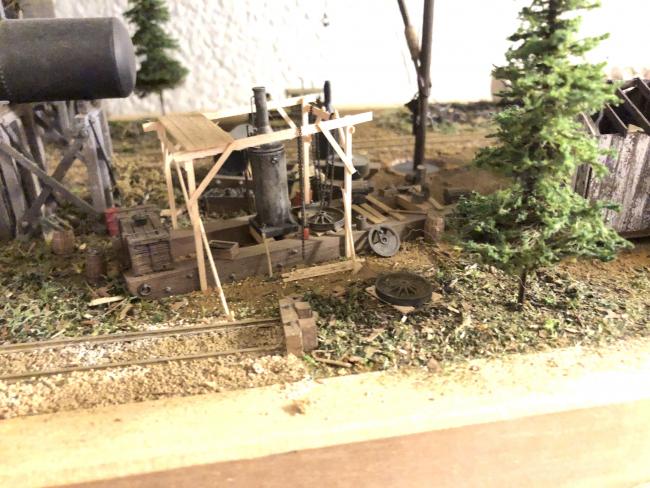
This is where we're at. All of the items on the skids are just set in place. The water tank looks like it's all black in the photos. But, the front wood portion is actually khaki (the boiler is casting a shadow on it.
Also, on the last photo i tried something a little different. i sprayed black, then while the black was still wet i sprayed automotive primer, that is what is giving it that texture. Then, after that i followed everything up with testors matte clear... I figured the extra texture would help with the weathering..?
I like the level of weathering on your first one. I certainly don't think it would be a rusty mess being repaired in the woods...that look would be for a donkey left to die. I've always been a fan of the white streaks that run down boilers. Though I have never been able to create them very well.
The photo below is the kind of weathering that I would like to be able to do on a donkey. It looks to be a Washington road engine which CHB produced at one point (ahem). Interesting home made hoist in the pic as well.
Something somewhat like this? The first two photos are of Karls boiler for his mill engine and boiler house. The second and third photo are my attempts to follow his work. I could try more streaking. As long as i dont lock it in place with lacquer we can adjust and recommended.
I wonder if that would be oxide rust, or oil/fule/dirt/rust? Is that a fuel oil drum?
Rick
Thanks.
If you have any idea's or recommendations. Please feel free.
Please let me know what you think. good or bad; as long as it's honest.
I never built one and it looks like you bare doing a fine job.
I will work on the Dolbeer a bit more this up coming week. Right now i think i will put all the plumbing in place and then stop. The decision will need to be made as to what to do with the piston assembly. as well as the components on the skid. I have most of that stuff assembled in sections; but, nothing is glued down. Would it be weird for the rope spool to have been taken off for service?
I'll try to find some reference photos for Dolbeers under repair.
As this have become a 2 part forum build, i thought i would ask the group about the placement for the crane? I put my finished Dolbeer on the diorama for perspective ect. I've also labeled 2 possible options that i saw. if you like one or the other, please note which one you like. Or, if you have a different option, please feel free to download the below image and label your preferred location. With location 2, if i want to tie the top post to a tree there are 2 trees behind the post, as can kind of be seen from the ground hog holes
Or, should the dolbeer be moved and the crane put where the dolbeer is? Also, does anyone have any ideas as to height in real inches? i was thinking somewhere between 8-12" tall. Or, Should we do a huge one like in the HO scale Donkey repair?
Any and all input is welcome.
If you are thinking of the jib that you posted earlier, it could easily go in either spot. You could make it as if they used a tree as the mast...like a mini spar tree. Something about 12" diameter and 30'-40' tall would work. This would look very natural in your setting.
If you go with something constructed from timber, then I'd go for spot 1 if you want to keep the deadfall area in spot 2.
I think you are on the right path by placing the main components and taking photos. Move around and take some more photos. Gives you a chance to think about it a lot.
Thanks Kevin!