Howdy, Stranger!
It looks like you're new here. If you want to get involved, click one of these buttons!
Categories
- 954 All Categories
- 3 Picture Posting and Resizing
- 60 New Member Introductions
- 100 Off-Topic Forum
- 2 Photography
- 2 Resources
- 18 New Product Information
- 164 The SierraWest Forum
- 11 Brett's Blog
- 120 General News & Ramblings
- 3 Re-Release Information
- 1 Q & A about SierraWest
- 9 What Would You Like to See?
- 405 Builds
- 145 HO Scale Builds
- 185 O Scale Builds
- 58 Finished SW Build Pics
- 11 Miscellaneous Builds
- 185 Techniques
- 19 Working with Wood
- 23 Painting Castings
- 4 Masonry
- 16 Scenery
- 37 Tools and Supplies
- 22 Layout Planning & Building
- 38 Miscellaneous
- 19 Prototype Information
- 18 Reference and Research
Kit 312 Truck Repair Shop
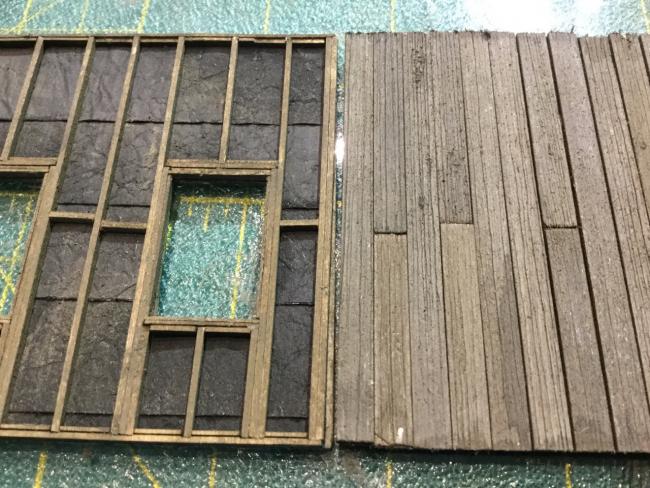
I'm going to stick to the plans for the most part with this kit. I was able to get started on the walls over the weekend. I did add some texture to the tarpaper. When I was looking for prototype pics they all had wrinkles in the paper...at least the old shops did. So I crumpled up the paper then ironed it flat again then painted with black and dark gray prior to installation.
I've identified some glue spots in the super closeup that will need to be removed. I'm also planning on giving a gray drybrushing to the exterior. Also planning on having a vehicle in the scene. I'm thinking a Fordson wrecker or tractor...perhaps both if it's not overkill.
Have not decided yet whether this will be done as a diorama or as part of the layout. I have a spot on the layout, but I have long-term plans to re-do the layout so...


Comments
Geezerbill
I've actually been managing a 16U travel softball team which consumed nearly all of my spare time. Oh, and going to some Nats games!
Geezerbill
I'm trying some new wood painting techniques for these castings.
Mike S.
Base coat tan. Enamel dark brown wash...let sit for 15-20 min then wipe off excess with Q-Tip. Let dry. Black/brown acrylic on fine brush to pick out dark graining. Light kahki on fine brush to pick out light graining. Heavy dry brush old wood color to blend the streaks. Enamel filter for brown wood to further blend. Light dry brush with light kahki. Pin wash dark brown enamel around metal pieces, deep grain, and shadow under lip of bench. Textured rust on hinges followed by touch the edges with graphite. Slimy green at bottom of bench where it will contact ground and just a touch on top of bench corners.
Mike S
I feel like we spend a lot of time detailing individual boards with brushing, adding knot holes, banding, splintering, etc...even before we start staining them. Why then should we look for the fastest or easiest ways to paint these outstanding castings?
I've always admired Robert's painted castings that he has posted here. Reminds me of the detailing done by the military modelers. So I'm giving it a try...and am leaning towards trying the same technique on real wood at some point.
So here I took 2 small castings that have been primed. Painted them by dipping a brush into the brown wash seen here then dip brush into odorless spirts and brushing the mixture on the casting in pic 2. 15 min later, take most off with Q-tip. You could speed up the drying process by using a hair dryer right now and continuing, but I'm going to let them dry overnight and resume tomorrow.
Mike S.
These next steps just took me about 15 min total. The castings are set aside to dry again. I think I could realistically do 20 or so at a time. I think this technique will lend itself better to the larger wood castings vs small.
What I'm looking to do is add visual depth to the casting with paint. Pic 1 I've added black/brown lines. I put a drop of paint on the glass and mix with a drop of airbrush cleaner to thin. Apply with an 0 brush. Pic 2, add light tan lines, pic 3 heavy drybrush with middle color to blend stripes together. Pic 4 I've added brown filter on left, and gray filter on right.
I'll evaluate them once dry. I anticipate giving a light drybrush with tan and a pin wash of dark brown to highlight nail holes, gaps between boards, etc. I'll darken the back boards on the shelf and add some moss to the bottom of the crate.
Pic 1 I drybrushed lightly with khaki. Pic 2 added a pin wash of diluted brown wash. Note the pooling on top of the box. One of the things I love about enamels is that if you give this a couple minutes to dry, you can take that pooling completely out while leaving the color in the spot where you want it. Pic 3 & 4 are after they dried. Pic 5 I added just a touch of green mold to the box that was probably left outside.
Mike S.